Roofs. They’re one of those things that every home needs. It’s kind of important if we do say so ourselves. I have yet to find anyone who has disagreed with that statement. We recently had an odd request by one of our clients in Orland, CA. They asked what it would take to build the perfect roof deck. We’re not if there’s anyone else out there wondering what it takes, but Nor-Cal roofing wanted to share with you how to build the perfect roof deck. Here it goes:
Goals. Come up with a goal for what you’re going for with your roof deck. Is it to have a peaceful escape? Is it your family’s sanctuary? Is it an entertainment place for out of town guests? Is it a meeting place for business colleagues? Once you have the goal for your roof deck settled, it will be easier to design and conceptualize your roof deck.
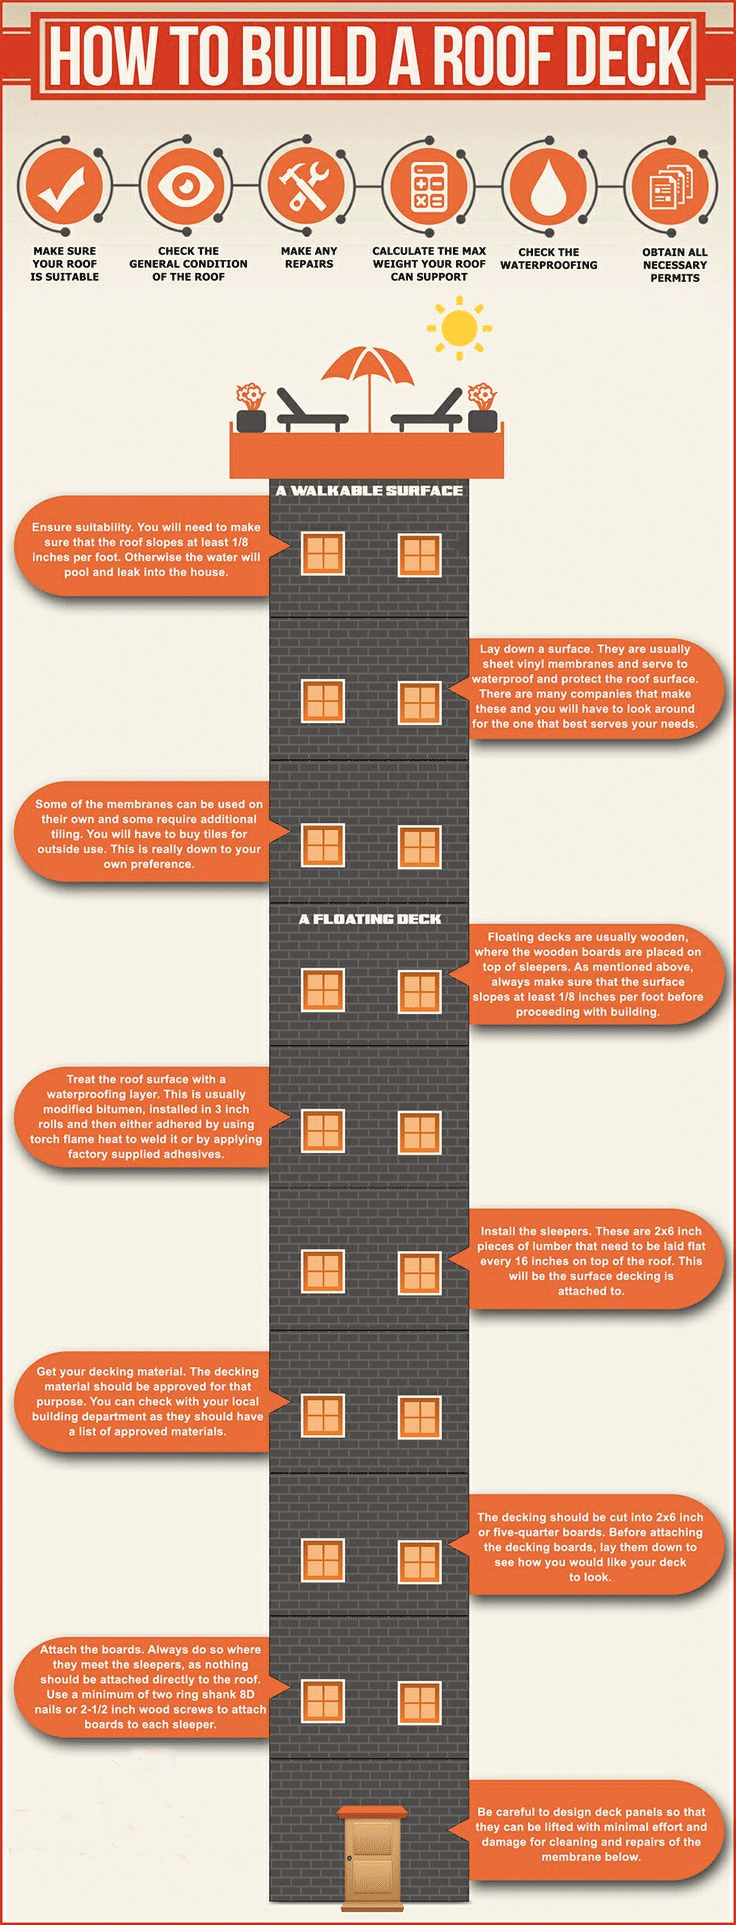
Make sure your roof is suitable for a roof deck in general. The last thing you want is to put a deck up and end up with water damage because your roof is no longer functional. Ensure suitability. You will need to make sure that the roof slopes at least 1/8 per foot. Otherwise water will potentially pool and leak into the house. This is no bueno! We want a roof deck that will still prevent water damage and other disasters.
Make sure your roof is functional. This is probably covered under make sure your roof is suitable but we thought we’d clarify that your roof should remain functional for a variety of aspects including protection from outside natural disasters, weather, etc. In order to put a roof deck on your roof it’s imperative to ensure that your roof will above all else still function as a roof.
Full proof the general condition of the roof (so that it remains suitable). It’s important to laydown a surface. They are usually sheet vinyl membranes and serve to waterproof and protect the roof surface. There are many companies that make these and you will have to look around for the one that best serves your needs.
Treat the roof surface with a waterproofing layer. This is usually modified bitumen, installed in 3 inch rolls and then either adhered by using torch flame heat to weld it or by applying factory supplied adhesives.
Install the sleepers. These are 2 x 6 inch pieces of lumber that need to be laid flat every 15 inches on top of the roof. This will be the surface decking is attached to.
Get your decking material. The decking material should be approved for decking purposes. You can check with your local building department as they will have a list of approved materials for roofing decks. You don’t want to end up with materials that are not approved for decks.
The decking should be cut into 2x 6 inch or five quarter boards. Before attaching the decking boards, lay them down to see how you would like your deck to look.
Attach the boards. Always do so where they meet the sleeps as nothing should be attached directly to the roof. Use a minimum of two ring shank 8d nails or 2 1/2 inch wood screws to attach boards to each sleeper.
Be careful to design deck panals so that they can be lifted with minimal effort and damage for cleaning and repairs of the membrane below.
We love building roofs for all of our clients and here to help you build yours!
Nor-Cal Roofing is Northern California’s premier choice for residential and commercial roofing projects in Chico, Orland, Corning, Oroville, Hamilton City, Durham, Paradise and other surrounding North State areas in Butte and Glenn Counties. If you would like an estimate or consultation on roofing services please feel free to call us at (530) 892-9960!

